TabView In Your Blog - A widget for BloHow To Use Custom Domain On Blogspot - 4 Steps + Screen Shotgger

lundi 11 août 2008 0 commentaires

This should be I think a part of answers for the most FAQ on GIMME BLOG!

How to use yourname.Com SubDomain on your Blogspot / Blogger Blog.

Take a look at this pictures below, click on thumnails to see the actual size

1. Go to your Dashboard -> Setting -> Publishing

custom-domain-on-blogger1

custom-domain-on-blogger1

Thick the Custom Domain.

2. Click The Switch To Advanced Setting

custom-domain-on-blogger2

custom-domain-on-blogger2

3. Now Type YourName.JackBook.Com Subdomain

custom-domain-on-blogger3

custom-domain-on-blogger3

This is an automatic system. So as long as your requested name is still available, (not taken yet by the other) then you will be able to use it. Don’t forget to read The TOS

After you clicked the Save Setting button, the option to redirect www to non www will be active.
example: www.yourname.jackbook.com will be redirected to yourname.jackbook.com.

4. Thick that option to activate it.

custom-domain-on-blogger4

custom-domain-on-blogger4

Save it again, and now you are done.
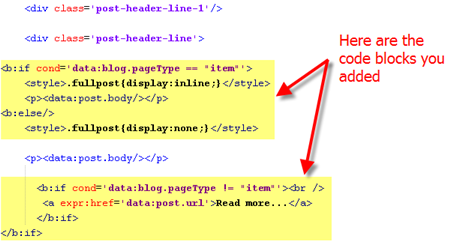
Read full post >>

Labels into Horizontal Tabs - A Blogger Hack

0 commentaires

Below are the instructions on how to turn "Labels into Horizontal Tabs,"

Step 0: Label your posts.

Make sure your blog has some posts with label assigned, otherwise nothing will get created. See this topic on how to create labels:

http://help.blogger.com/bin/answer.py?answer=44498&topic=9084


Step 1: Downloading and unzipping the file from the Exploding Boy website

Here are the downloading and sample links:

http://www.exploding-boy.com/2005/12/15/free-css-navigation-designs/

http://exploding-boy.com/images/cssmenus/menus.html

Then, have a googlepages account and upload the pics there.

Step 2: Changing the Header to become appendable.

Modify this line:


to become

2
" showaddelement="yes">


Step 3: Prepare the CSS portion of the hack.

Go to the very end of this article and cut the CSS portion you like there, then paste it at the very end of the CSS code (right before the closing CDATA part - see picture below)

Make sure to replace "www.yourwebsite.com" to your website.


Below is an example of pasting the code for style F:


/*- Menu Tabs F By http://www.exploding-boy.com/2005/12/15/free-css-navigation-designs/------
*/

#tabsF {
float:left;
width:100%;
font-size:80%;
line-height:normal;
border-bottom:1px solid #000;

}
#tabsF ul {
margin:0;
padding:10px 10px 0 50px;
list-style:none;
}
#tabsF li {
display:inline;
margin:0;
padding:0;
}
#tabsF a {
float:left;
background:url(" http://www.yourwebsite.com/labeltabs/tableftF.gif") no-repeat left top;
margin:0;
padding:0 0 0 4px;
text-decoration:none;
}
#tabsF a span {
float:left;
display:block;
background:url(" http://www.yourwebsite.com/labeltabs/tabrightF.gif") no-repeat right top;
padding:5px 15px 4px 6px;
color:#666;
}
/* Commented Backslash Hack hides rule from IE5-Mac \*/
#tabsF a span {float:none;}
/* End IE5-Mac hack */
#tabsF a:hover span {
color:#FFF;
}
#tabsF a:hover {
background-position:0% -42px;
}
#tabsF a:hover span {
background-position:100% -42px;
}


Step 4: Adding Label Widget

Follow the instructions from this article, especially step B.4. After you've done with inserting the code & save it, go to Page Element option and drag the newly added widget to stay under the Header area (that we fixed so that it would accomodate this new widget.)


id='tabsF'>


If you use a style other than F, than make sure id='tabsF' reflects the correct tab, such as id='tabsE' for style E. Later, if you like a different design, just cut-and-paste the style's CSS code, then change this id again to reflect the change.


There you have it! Well-designed tabs from professionals (The Exploding Boy website) being integrated into the new Blogger Beta.


Enjoy This hack !!!

Read full post >>

Add The Blogger “Read More” Expandable Posts Link - Blogger Hack

0 commentaires

This is a pretty popular Blogger hack that lots of people have asked me about. Instead of answering to each email individually, I thought it would make more sense to write an article about it.


With this hack, you can choose to display a select amount of text from the beginning of each post as a teaser instead of showing the entire post on the front page of your blog. Then when people want to read the rest of the post, they can click a “read more” link to see the full post. This is very handy if you have lots of long articles all on one page. (Note that you’ll need to have post pages enabled in order to make this feature work.)


Step #1 - Update Your Template Code


First you need to edit your existing code so I recommend copying and pasting it into notepad or any text editor. Also, it’s smart at this point to create a backup of your template just in case something goes wrong. Now do a search (CTRL + F) within the text editor for the following code post-header-line-1. This is the default code that Blogger includes but some custom templates remove or change this code so you might have trouble finding it. If you can’t locate this text then try searching for instead. Your template will for sure have this since it’s the tag that actually prints the body of your post.


Now depending on which code you were able to find will determine how easy the next steps will be. You might need to do some detective work first in order to get this working properly in your custom template. The idea is to get this new code into your template before the tag. Keep reading and hopefully the explanation will illustrate the concept clear enough so you are able to adapt this hack to your custom template.


Add the following code below the

and
tags if you’ve got both.


The result should look something like this:


new-code-block.png


If you don’t have the default

tag then your result should look something like this instead. This is how it would be done in the MushBlue Blogger custom template:


new-code-block-mush.png


Notice in both examples that the code in yellow and the tags are the same — it’s just tag above it that will differ based on the template you’re using.


Now let’s add one more bit of code which will actually create the “read more” link in your post. This code will go below the tag so copy the following and paste it in. Feel free to change the “Read more…” text to whatever you want the link to look like. Be careful not to delete any other code during this process.


Read more...


Yes, there are supposed to be two tags in the above code so don’t think it’ s a mistake. The result should look like this:


new-code-block-2.png


This code will be the same no matter what template you are using. Just make sure it goes below the as shown in the image above.


Now let’s look at what the final result should be. Here’s the updated code block you just worked on all put together:


new-code-block-3.png


Ok, you’re all done editing the template code. Paste it back into your Blogger html window and save it. If you get an error, you made a mistake. The most common mistake is to accidentally delete a > or <>

Step #2 - Add a Class Tag in Your Default Post Template


For this step, you need to navigate in your Blogger account to “Settings” => “Formatting” and scroll all the way down to the bottom. It’s the last option called “Post Template”. You’re going to paste in the following code:


You’ll want to keep the spaces in there which will make sense later. After you save this, it will look like this:


post-template2.png


Step #3 - Create a New Post


Ok, we’ve got everything all setup so it’s time to go and test it out. Hopefully you’ve got a new post in mind for your blog. If not, then we’ll just create a test post which you can later delete. When you click on the “Posting” tab, you’ll notice that the post text area is now pre-populated with the and tags. If not, then you didn’t save it properly so go back and re-read step #2.


So when writing your new post, anything you put above the tag will be the teaser text. The main body of your post needs to go in between the and tags in order for the “read more…” link to work properly. See the screenshot below. Sometimes pictures illustrate better than words.


post-template-result2.png


Now publish or preview your post to see the “read more” hack working on your blog. If it doesn’t show up for some reason, go back and run through the steps again. Most likely you pasted the code blocks in the wrong places. It’s difficult to troubleshoot these issues since each template can be unique so please make sure to double-check your template before asking for help in the comments section below.


Here’s the live post with the “read more…” link properly working based on the text I used above in the post text area.


post-results.png


Additional Info


If you want to go back and update your old posts with this new “read more…” feature you can. Just go back and edit each post manually. Essentially you’ll need to paste in the and tags breaking apart the post into two parts.


For some posts, you might not want to use this feature at all. If that’s the case, just delete the and tags from within your new post text area. Then your new post will show up entirely just like it used to before you implemented this hack. Enjoy!

Read full post >>

Recent Posts Widget for Blogger

0 commentaires

With “Recent posts” widget you can show recently posted posts or you can say all posts in one list which may help your visitor to browse around your blog or site.

Here’s the procedure on how to in stall the widget on your blog :


Just copy the above code and paste it in new widget/Add page Element of your blog.
Also, don’t forget to add your sitename in the last line of HTML code where I’ve mentioned “http://yoursitename.blogspot.com”.
I mean just replace it with your sitename and you are done.
The above code refers to recent 10 postings from your blog. But if you want to change it you change it by changing the number of "numposts" in the given code

Example - If you want to show 5 posts instead of 10 then simply change numposts to 5 which will become :- numposts = 5

Read full post >>

Yahoo Search Widget Blogger / Blogspot

0 commentaires

I have mostly seen yahoo search boxes on most blogs.So i thought of implementing a cute looking yahoo search box widget for blogs.This search widget can search either your blog alone or the entire web.This is just a simple search widget which will nicely fit into your blogger sidebar..

This search box has the google branding logo inserted within the search box.By default the search widget will search your blog.The user can opt to search the entire web if he wants.. To install the widget you may use the widget installer below..


Note:-If you are reading this in a feed reader the widget installer may not be displayed properly..So just visit the original post to get it installed..

Read full post >>

Blogger Template : Minyx 2.

0 commentaires

converted from wordpress theme created by Mauricio Caballero


minyx template for blogger


Top menu is a links list

Recent Post is your blog feed

blog archive is Flat

19 spt
top menu and search fixed

Read full post >>

New blogspot template - Christmas Days- for free download

0 commentaires

Blogandweb has released a new blogger template, especially for this special occasion Christmas. It is based on the theme for wordpress "Christmas Days” from Design Disease and is available for free download under Creative Commons.

The main features include Script with countdown to Christmas, Customizable menu, style in your comments, two column design, etc.

For download and installation guide click here

To see live demo click here

For more blogger template-classic and new click here

Read full post >>

O2 Wordpress theme for blogger

0 commentaires


To beautify your blog here is another blogger template from Blogandweb. This is a very stylish design web 2.0 template and is based on the theme for wordpress "O2"customized for Blogger under the GPL.

Features include -

* Defining colors on the panel.

* 3 main pillars.

* Style comments.

* Search internally.

* Customizable menu.

See live demo here

Download

Read full post >>

Black blogger template

0 commentaires

This is a two column black template for blogspot users. Features include customizable menu, internal search, two column and simple design.

To customize menu do as follows. After installation select edit ‘HTML’ and look for the following code and replace # symbol with the link address like httt://example.com.


  • Please Read it before installing Template

  • See Live Demo here

  • Download - ZIP
  • Read full post >>

    Dilectio Wordpress Theme for Blogger

    0 commentaires


    Dilectio theme for Wordpress is originally launched for readers of the Smashing Magazine and is converted for Blogger by BlogandWeb and licensed under Creative Commons.

    This is a 3 column xml template for new blogger and can use it for personal or business with the sole condition that they respected credit, returning a link to BlogandWeb and Design and Disease.

    Features includes – defining colors on the panel, 3 column, customizable menu, search bar, style comments etc.

    Download – Blogger

    Read full post >>

    How to Embed Images as Background

    0 commentaires

    Blogger Template Design: Tutorial 12

    If you look at these templates - Lasik, JournallRed, and Minimalizt - you'd notice that the background is not of a plain color, but made from a repeating pattern of an image. This image is called a background image. It can be a single large image that fills up the screen or a small image (say 50 x 50 pixels) that repeats horizontally and/or vertically. The neat thing about using, or embedding, a background image is that you can create any image you like and use it in your blog to make it unique and different from other blogs.

    A background image can be placed in any container - either inside the Body container (which fills up the entire screen), inside the Post, Sidebar, Comment, or even on a header container (say, a Comment Header). For example, if you look at the Minimalizt template, you'll see that the Comment Header below the post is a rounded green button - which is an image embedded inside the Comment Header.

    You can also use an image to create a shadowy-looking side frame (now quite common in blogs). See the Hazy template to see how it looks. To do this, you create a short background image with a long span that fills the whole width of the template. At the right and left edge of the background image, you create the shadowy pattern (or any other pattern that you want to be the frame), and embed this inside the outer-wrapper container, repeating it vertically.

    But, how to embed and how to repeat the image vertically, horizontally, or both in directions?


    To Embed Background Image:

    Say that you want to use a 100 x 100 pixels image as the background image inside the Sidebar1 container. What you need to do is find the sidebar1 {...} container in CSS Styling and add the following code in red (the other codes are just sample codes):

    #sidebar1 {
    margin: 0px 10px 15px 10px;
    padding: 0 0 0 0;
    width: 150px;
    background: URL(http://the-url-of-your-image) repeat left top;
    text-align: left;
    }


    The "background:..." code will embed whatever image at whatever URL you put and repeat the pattern both vertically and horizontally. The location of the starting image will be on the left-most side, and at the top-most position. The general command for embedding a background image is:

    background: URL(http://...) repeat-command x-position y-position;


    All Repeat Command:
    • no-repeat (the image won't be repeated at all)
    • repeat (repeat horizontally and vertically)
    • repeat-x (only repeats horizontally)
    • repeat-y (only repeats vertically)
    All Horizontal (x) Position Command:
    • left (puts the starting image on the left-most side)
    • center (puts the starting image at the center)
    • right (puts the starting image on the right-most side)
    All Vertical (y) Position Command:
    • top (puts the starting image on the top-most position)
    • center (puts the starting image at the center)
    • bottom (puts the starting image on the bottom-most position)

    Read full post >>

    Installing the template in your blog

    0 commentaires

    Before you start changing your template, make sure you save your old template file just in case you need to start again. And make sure you have a programming-based text editor installed on your computer (to make the codes easier to see. If you don't have one, there are many free programming text editors that you can download. I use Notepad++).

    These are some instructions on how to put the template in your blog. There are some ways to do it; I'll explain some of them, starting from the simplest methods.

    For tips to improve template usage and common problems faced when installing these templates, read this post, or here if you fail to upload template.


    METHODS TO INSTALL BLOGGER TEMPLATES:

    Method I. Simplest method - Uploading the xml file:

    1. Download the template that you want and save it in your computer (make sure it is saved as xml file).
    2. Go to your Layout > Template > Edit HTML page.
    3. Choose the file from the Browse... button, and then press the Upload button.
    4. It may ask you to delete some widgets - so just delete them. (Widgets are the extra page element added to the sidebars).
    5. You're done! View your new blog.
    6. If your contents doesn't look aligned, that's probably because you don't have any widget on one of the sidebars - so add your widgets.

    Method II. Copy-paste the template codes into the Blogger text editor:

    If you don't want to download the file first, or prefer to paste the code into your Blogger editor, this is how to do it.
    1. Open the template file that you want and copy all the codes.
    2. Got to your Layout > Template > Edit HTML page.
    3. Click the Expand Widget Templates (EWT) button. (If the EWT button is on or clicked, all template codes will be visible; if it's off or unclicked, then some codes related to Blogger Data are hidden so that the HTML codes look less messy - most of the time, you don't want to change or add codes inside the Blogger Data area).
    4. Select all the codes in your Blogger editor and delete them all. Then paste the codes for your new template.
    5. It may ask you to delete some widgets - so just delete them. (Widgets are the extra page element added to the sidebars).
    6. You're done! View your new blog.
    7. If your contents doesn't look aligned, that's probably because you don't have any widget on one of the sidebars - so add your widgets.

    Method III. Copy-paste the CSS styling only into the template code:

    The annoying part about using the two methods above is that you have to delete some widgets that you've made (maybe some Adsense codes, Text contents, HTML codes - usually the widgets About Me, Labels, and Blog Archives are not deleted). If you don't want this to happen, you must copy and paste the CSS styling part only. By changing the CSS part only, you don't change anything related to the Blogger Data including the data about the widgets that you've made.
    CSS styling is the code that controls everything about the template style or appearance - the font size, colors, background images, header size, post layout, sidebar size and locations, etc.
    But to do this is a bit tricky. You have to make sure the basic layout of your old template with the new one is the same. For example, if the old template has 3 columns (2 sidebars and 1 main), your new template has to be 3 columns too. The arrangement of columns will follow the old template; for example SMS or MSS or SSM. If the old and new templates don't have the same content layout, it won't work! If you're not sure about this, just use the first 2 methods above.

    If you still want to change the CSS styling part only, read on below.

    In the template, look for the code section in between the b:skin tags. In my templates, I've labeled the start and end of the CSS styling part. (In the code, the 'Page structure tweaks' code are actually part of the CSS styling too, but just leave it there.)

    So, these are what you need to do to change the CSS part only:
    1. Open the template file that you want and copy the CSS styling code only.
    2. Got to your Layout > Template > Edit HTML page.
    3. Don't click the Expand Widget Templates (EWT) button because you don't have to change the Blogger Data code.
    4. Select the existing CSS styling codes in your Blogger editor and delete them. Then paste the codes for your new template.
    5. It may ask you to delete some widgets - so just delete them. (Widgets are the extra page element added to the sidebars).
    6. You're done! View your new blog.
    7. If it doesn't work, you can always use the first 2 methods above and add the widgets later.

    Read full post >>

    Tips and problems when installing templates

    0 commentaires

    Here are some tips you can use to improve reliability on using these templates and some problems you might encounter when installing and how to solve them.

    Tips on using background images:

    The background images (images of the header, main background, content background, title bar, list background, etc) are stored in my flickr account. I can't guarantee the reliability on fetching these images all the time. So I suggest that you upload the images for a particular template that you're using and store them somewhere else. Simply get the image URLs from the xml code and change the URLs in the code (in red) to point to the new address of the images.

    Example of code:
    background: #000000 URL(http://...........) repeat left top;

    Check all URLs in the CSS styling section and not just the first one you see in the code.

    Caution with Header section alignment:
    If your Header section look misaligned the first time you upload any template into your blog, that's probably because your Header Title and Description is too long and wrapped into a second line. If this is the case, shorten them or make them smaller. If not, it might be that your Linkbar is empty or your own uploaded header image size is wrong.

    Caution with uploading your own Header image:
    When you upload your own header image from the Header Layout page, the whole section or some part of it can be misaligned or cut off if your image is not compatible (having the right size) with the template. Read here for more details.

    Caution with Linkbar:
    If you use any template with linkbar, the Header section might look weird and cutoff the first time you upload it into your blog. It's because your linkbar is empty (without any links yet). So fill up you links and the Header section will turn to normal again.

    When Blogger can't save your new template:
    If Blogger can't save the template because there are more than one IDs (for example ID for LinkList, HTML, Adsense, etc), simply go back to your old template and delete all widgets (also called page elements) except the basic ones (like About Me, Labels, and Blog Archives) and reinstall the template. You can later add the widgets back on.

    Read also some other common template problems if you
    fail to upload template.

    Report your problems here:
    If you face some new problems w
    hen installing my templates or if you want to share some tips, put your questions or tips in the Comment section. I'll try to answer them as soon as I can.

    Read full post >>

    Fail to Upload Template?

    0 commentaires

    This happened to me just now when I tried to upload my own template using Firefox browser. I got an error message from Blogger.

    But it worked fine when I uploaded the template using Internet Explorer browser. So if you have the same problem on Firefox when uploading these templates, try using the Internet Explorer. I don't really know why, but as long as it worked, that's all that matters.

    To download internet explorer or firefox try soft-generation.blogspot.com

    Read full post >>

    Using an Image as the Sidebar Title

    0 commentaires

    I love the effect of that an image gives as the sidebar title. It is such a simple thing to do. First things first. You will need a suitable image


    that you can change the font on. My suggestion would be to make one using GIMP. This may help: Tutorial: custom header for Blogger using GIMP. Save your original (fontless) image as a template for changes you may make down the line to your sidebar. Look. I made one for Links!

    OK. We have an image or two ready to go. My title image is for links, so I will show you how to do a widget for links. Open your Dashboard | Layout | Page Elements | Add a page element | HTML/Javascript. Add the following code to the window:


    LINK TITLE

    LINK TITLE
    You can add as many links as you want by opening (edit) the widget and adding this code:
    LINK TITLE
    for each new link. It certainly is a fun way to dress up your sidebar and coordinate it with other design elements in your blog.

    Read full post >>

    Scroll Box

    0 commentaires

    ...What I would like is a place to put widgets, links, webrings, etc in a
    box which shows a little of the content and then can be scrolled down
    to see the rest. Just like the thing on my site from Technorati, but I
    want to add my own content, not just links...

    Laura wanted a way to organize her sidebar...something more than the now famous Hide/Show hack. What she wanted was the classic scroll box.

    Here is how you do just that. Open your Dashboard | Layout | Add a Page Element | HTML/Javascript. Add this code in the window:

    width:350px; height:250px; overflow:auto; color:#FFF;">

    ADD TEXT OR CODE SCRIPT HERE

    You will adjust these bits of code for width and height. Each blog will be different, so play with the numbers until the scroll box fits in the area you want. You will add the code you want displayed here...be it javascript or plain text. You may want to put a
    or two between lines of code to separate the items.

    If you use a Classic Blogger template, instead of putting the code in a widget, you will put it in your sidebar area amongst the other items that live in your sidebar.

    So, go ahead! Gather up all your little do-dads and put them safely in the scroll box and be happy. Have a cup of coffee and admire your work!

    Read full post >>

    Blog Directory

    0 commentaires

    Making website / blog is a easy matter. But your next jobs are bringing many visitor steps into your blog. It's not easy. You require promoting your blog. Best way to promote your blog is trying to get main listing in search engine result page. If somebody search any keyword from search engine (especially with Google ) – your blog must be listed in first 5 pages(from a million result pages!!) Yeah, you vieing with thousands or millions of websites in this cyber world

    Search Engine Result Page is very influenced by the storey, popularity level of your blog. More and more your blog URL is contained in other website, your blog popularity will getting higher. Therefore, to increase your blog popularity, you can register your URL blog at some professional directory like :

    Read full post >>

    List of Search Engine - Promote your Blog

    0 commentaires

    To get high traffic, you require promote your blog. The effective way to promote your blog is by registered it into search engine. In the following, there are some url Search Engine, you can submit your blog there:

    Adnet
    http://www.theadnet.com

    Ah-ha
    http://www.ah-ha.com/addurl

    Alldeal
    http://www.alldeal.com/add_site

    Altavista
    http://www.altavista.com/cgi-bin/query?pg=addurl

    Arkesini
    http://www.arkesini.com/links/links.htm

    Anzwers
    http://www.anzwer.com/cgi-bin/print_addurl.pl?

    Asiaco
    http://www.search.asiaco/cgi-bin/addurl.cgi
    Asiannet
    http://www.asiannet.com/joinus.html

    Asia Search
    http://expatsinasia.safeshopper.com/

    Batavianet
    http://www.batavianet.co.id/addurl.html

    Canada.com
    http://www.canada.com/search/web/addurl.asp

    Claymont
    http://www.claymont.com/cgi-bin/addurlsform.pl

    Crawler
    http://www.crawler.com/

    Direct Hit
    http://www.directhit.com/util/addurl.html

    DMOZ
    http://dmoz.org/add.html

    Euroferret
    http://www.euroferret.com/addurl.html

    Excite
    http://www.excite.com/info/add url.html

    Funkycat
    http://www.funky-cat.com/webmastera.asp

    G.O.D
    http://www.god.co.uk/add.htm

    Go
    http://www.go.com/AddUrl?&pg=SubmitUrl.html

    Go2Net
    http://www.go2net.com/help/faQ/add-url.html

    Google
    http://www.google.com/addurl.html

    GottaBounce
    http://www.gottabounce.com/cgi-bin/links/add.cgi

    HotBot
    http://www.hotbot.com/addurl.asp

    Indo Center
    http://www.indocenter.co.id/add.html

    Indoseek
    http://www.indoseek.co.id/add.html

    Info Tiger
    http://www.infotiger.com/addurl.html

    Infohiway
    http://www.infohiway.com/isn/addurl.html

    Infoseek
    http://infoseek.go.com/AddUrl?pg=SubmitUrl.html

    Lycos
    http://www.lycos.com/addasite.html

    Magellan
    http://magellan.excite.com/info/add_url/

    MSN.com
    http://search.msn.com/addurl.asp

    Mugomilk
    http://www.mugomilk.freeserve.co.uk/html/addsite.html

    National Directory
    http://www.nationaldirectory.com/cgi-bin/addurl

    Nerd World
    http://www.nerdworld.com/nwadd.html

    Net Announce!
    http://www.ersoros.com/net-announce/content.phtml

    NetBreach
    http://www.netbreach.com/addurl/

    Netfind.aol.com
    http://netfind.aol.com/add.adp

    NetSearch
    http://198.80.94.66/cgi-bin/search.pl?AddSite=prompt

    Northern Light
    http://www.northernlight.com/docs/regurl_help.html

    Peekaboo
    http://www.peekaboo.net/index1.html

    Power Crawler
    http://www.powercrawler.com/addurl.cfm

    Project Cool
    http://www.projectcool.com/sightings/submit.html

    Profusion
    http://www.profusion.com/users.sitesee.html

    Proteus
    http://www.thrall.org/proteus/urlsub.htm

    PureSearch
    http://www.puresearch.com/addsite.html

    Scrub The Web
    http://www.scrubtheweb.com/addurl.html

    Search Hound
    http://www.searchhound.com/pages/submit.htm

    Search King
    http://www.searchking.com/add.htm

    Serach Spot
    http://www.searchspot.com/info/suggest_site.htm

    Search UK
    http://www.url.searchuk.com

    Searching 4 U
    http://www.searching4u.com/links/link.htm

    Site @ Hack
    http://www.sitehack.com/submit.htm

    Spider Hog
    http://www.spiderhog.com/addurl.htm

    Shop Internet
    http://www.ro.com/shopinternet/submit.html

    Super Snooper
    http://www.supersnoopel.com/addurl.htm

    Surfgopher
    http://www.surfghoper.com/addurl.htm

    Teledom
    http://www.teledom.net/add.shtml

    Voila
    http://www.voila.com/info/addsite.html

    WebCrawler
    http://www.webcrawler.com/help/getlisted/addurls.html

    Webmaster Network
    http://www.wmn.linkopp.net/cgi-bin/add.cgi

    World Light
    http://www.worldlight.com/addsite.html

    Yahoo
    http://www.yahoo.com/info/suggest/

    Read full post >>

    Create Rounded Header Image for Blogspot

    0 commentaires

    How to make header image which " not like a box" and looked to be one with entire of your blog ?

    Easy! Use your ordinary program image editing. I’m using macromedia fireworks for image editing. Determine canvas size measure according to asked header image. Make rectangle with rounder model at its corner. Set its high larger ones from size measure canvas. and set its width = wide of canvas

    Place tabletop of rectangle at co-ordinate (0.0), so that its obtuse angle presented at part of canvas. Thereby the bottom-part of rectangle is not displayed at canvas

    Set of canvas color = color of background page of your blog, so that the part cut by corner of image will look one

    Export your result job!

    Read full post >>

    Most Beautiful Blogger 2 column

    0 commentaires


    Skiing Template [Download]

    Snow Time Template [Download]

    Tango Template [Download]


    Read full post >>

    Softlight Blogger Template

    0 commentaires

    here is a new free Bloger template

    Softlight is a simple 2 column template created especially for personal blog


    softlight blogger template


    Read full post >>

    Deep Blue Blogger Template

    0 commentaires

    Deep Blue Blogger Template Ready for Adsense or other ads


    deep blue blogger templat


    Read full post >>

    Underground Blogger Template

    0 commentaires

    This is a new Blogger Template as you can see,It is a two column with black/red color scheme
    This template was ported from original design by styleshout

    underground template

    A lightweight, fixed width, 2 column template. This design uses a black/red color scheme, very easy to customize and fast-loading.
    Download | Demo

    Read full post >>

    Anime Graffiti Template

    0 commentaires

    Description : This anime template looks very simple in two column but this design is so great and good looking. All widget were taken in nice place with clearly separated by line and background. I make this blogger template in width 770px, not large in order to make your visitor will more focus with your post. Its rather different with my previous post because I choose theme about anime graffiti. But don't worry, next time I will make anime template about naruto, one piece, deathnote, samurai x, inuyasha, bleach and other popular anime.

    Preview:

    Download:
    Tiger Blue Anime Graffiti Template

    Not only that, with this graffiti template I make three kind of header. You could change the header template if you don't like with that one.

    Simple Blue Anime Graffiti Template


    Direct Link :

    http://i516.photobucket.com/albums/u322/okayacool/Simple-blue-template.gif


    Kane Blue Anime Graffiti Template


    Direct Link :

    http://i516.photobucket.com/albums/u322/okayacool/Kane-blue-template.gif


    If you like with the other one, just change the header image URL on HTML code with the direct link above.
    For example : if you find the code like this one below change the red line with the blue line

    #header-wrapper {
    background:url
    ("http://i271.photobucket.com/albums/jj136/donagusto/template/Tiger-blue-template.gif") no-repeat;

    So it will see like this :

    #header-wrapper {
    background:url
    ("
    http://i516.photobucket.com/albums/u322/okayacool/Simple-blue-template.gif") no-repeat;

    I hope you like with this anime graffiti template. Happy blogging :).

    Please enjoy and share:

    Read full post >>

    Love Hina 01 Template

    0 commentaires


    Description : Love Hina template for the most part is quite enjoyable, consist of 2 column but in 3 layers, all widget available. Love Hina is one of the most popular girl anime. Before upload this template please make sure that you download your previous template. The next step, revert your template to classic template and upload it.

    Preview:

    Download:
    Love Hina 01 Template

    Read full post >>

    Love Hina 02 Template

    0 commentaires

    Description : Its similar with my new previous post, Love Hina o1 template. 2 column and 3 layers but there is different type, this template is new blogger template so revert to template classic is not necessary here. Love Hina Templates are very well template for you girl, because those are anime girl template. You could chose the other one if you like the classic template.

    Preview:
    Download:
    Love Hina 02 Template

    Read full post >>

    Naruto Shippuden Template

    0 commentaires

    Description : This Anime template is three column blogger template with adsense ready. Its about Naruto and others players when they were grow up on Naruto Shippuden Anime.

    Preview:
    Download
    Naruto Shippuden Template

    Read full post >>

    Naruto's Dream Template

    0 commentaires

    Description : This Anime template is three column blogger template with adsense ready. Its about the dream of Naruto, He wanna become Fifth Hokage just like his father Minato Namikaze.

    Preview:
    Download:
    Naruto's Dream Template

    Read full post >>

    Akatsuki Template

    0 commentaires

    Description : For Akatsuki fans, I made this Akatsuki template in three column. All Akatsuki member appear on header template.

    Preview:
    Download:
    Akatsuki Template

    Read full post >>

    Uchiha Clan Template

    0 commentaires

    Description : one of strongest clan on Naruto anime is Uchiha clan, with Uchiha ability for use sharingan power, they were able to be strongest shinobi. Get this Uchiha Clan template in three column.

    Preview:

    Download:
    Uchiha Clan Template

    Read full post >>

    One Piece Home Template

    0 commentaires

    Description : Cool Blogger Template with One Piece Header, get it for free. One Piece is one of legendary Anime, so its perfect to become background of our blogger template.

    Preview:
    Download:
    One Piece Home Template

    Read full post >>

    One Piece Enemies Template

    0 commentaires

    Description : As we know, Cipher Pol no.9 (CP-9) is one of the strongest mugiwara pirate's enemies. So I hope you like with this One Piece Enemies Template. This template is 3 column with video bar and slideshow which is making more cool and pretty. Get One Piece Enemies Template for free.

    Preview:
    Download:
    One Piece Enemies Template

    Read full post >>

    Samurai-X Lovers Template

    0 commentaires

    Description: It is so wonderfull to speak about lovers. Love is pure, love is happiness, love is beautiful. This anime template is 3 column template for new blogger template. So before upload Samurai-X Lovers template to your blog , it will more safe if you download your previous template.

    Preview:
    Download:
    Samurai-X Lovers Template

    Read full post >>

    Bleach Shinigami Template

    0 commentaires

    Description : This template used Bleach Anime as background of template. Bleach is one of popular japanese manga, even has been adapted into anime. I make it in two column and set it for new blogger template, so for you which would use this Bleach Shinigami Template, please don't forget to download your template before uploaded this one. If your template is classic template, please update your previous template to new blogger template. Happy blogging :)

    Preview:

    Download:
    Bleach Shinigami Template

    Read full post >>

    Conan Edogawa Template

    0 commentaires

    Template title : Conan Edogawa

    Description : New blogger template, 3 column, special anime background from detective conan with sidebar on right and left. Cool picture of conan edogawa on header and footer.

    Layout Preview:

    Download:
    Conan Edogawa Template

    Read full post >>

    Narusegawa Naru Template

    0 commentaires

    Description : A litle different with my previous Love Hina Template but I still used the main characters from Love Hina Anime as background. This Narusegawa Naru Template not only for new blogger template, I also make it in three column for real. Narusegawa Naru Template more show up the girl character and very compatible for girl's blogger.

    Layout Preview :

    Download :
    Narusegawa Naru Template

    Read full post >>

    Ichigo Kurosaki Template

    0 commentaires

    Template title : Ichigo Kurosaki
    Anime category : Bleach
    Description : New blogger template (XML), in Two column, Fixed Width and Editable. Background template used main player on Bleach anime, Ichigo Kurosaki. Best Quality in all size and resolution with IE and Firefox.

    Layout Preview:

    Read full post >>

    Naruto Love Sakura Template

    0 commentaires

    Template title : Naruto Love Sakura

    Description : New blogger template (XML), 2 Column, Fixed Width, Editable. This anime template used theme about love, I take picture which showing relationship between Naruto and Sakura. Used IE and Firefox browser for the best result of quality and resolution. This template specially for you all anime lovers.


    Read full post >>

    Naruto Love Sakura

    0 commentaires

    Template title : Naruto Love Sakura

    Description : New blogger template (XML), 2 Column, Fixed Width, Editable. This anime template used theme about love, I take picture which showing relationship between Naruto and Sakura. Used IE and Firefox browser for the best result of quality and resolution. This template specially for you all anime lovers.

    Layout preview :

    Download:
    Naruto Love Sakura Template

    Read full post >>

    Greenway Blogger Template

    0 commentaires

    Simplex
    NameGreenway
    Added 9.3.07
    Type Web 2.0
    Images No
    Preview | Download

    Read full post >>

    Simplex Blogger Template

    0 commentaires

    Simplex
    NameSimplex
    Added 9.4.07
    Type 3-Column
    Images No
    Preview | Download

    Read full post >>

    Pink Diva Template

    0 commentaires

    Cat Crazy
    NamePink Diva
    Added 9.6.07
    Type 2-Column
    Images No
    Preview | Download

    Read full post >>