TabView In Your Blog - A widget for BloHow To Use Custom Domain On Blogspot - 4 Steps + Screen Shotgger

lundi 11 août 2008 0 commentaires

This should be I think a part of answers for the most FAQ on GIMME BLOG!

How to use yourname.Com SubDomain on your Blogspot / Blogger Blog.

Take a look at this pictures below, click on thumnails to see the actual size

1. Go to your Dashboard -> Setting -> Publishing

custom-domain-on-blogger1

custom-domain-on-blogger1

Thick the Custom Domain.

2. Click The Switch To Advanced Setting

custom-domain-on-blogger2

custom-domain-on-blogger2

3. Now Type YourName.JackBook.Com Subdomain

custom-domain-on-blogger3

custom-domain-on-blogger3

This is an automatic system. So as long as your requested name is still available, (not taken yet by the other) then you will be able to use it. Don’t forget to read The TOS

After you clicked the Save Setting button, the option to redirect www to non www will be active.
example: www.yourname.jackbook.com will be redirected to yourname.jackbook.com.

4. Thick that option to activate it.

custom-domain-on-blogger4

custom-domain-on-blogger4

Save it again, and now you are done.

Read full post >>

Labels into Horizontal Tabs - A Blogger Hack

0 commentaires

Below are the instructions on how to turn "Labels into Horizontal Tabs,"

Step 0: Label your posts.

Make sure your blog has some posts with label assigned, otherwise nothing will get created. See this topic on how to create labels:

http://help.blogger.com/bin/answer.py?answer=44498&topic=9084


Step 1: Downloading and unzipping the file from the Exploding Boy website

Here are the downloading and sample links:

http://www.exploding-boy.com/2005/12/15/free-css-navigation-designs/

http://exploding-boy.com/images/cssmenus/menus.html

Then, have a googlepages account and upload the pics there.

Step 2: Changing the Header to become appendable.

Modify this line:


to become

2
" showaddelement="yes">


Step 3: Prepare the CSS portion of the hack.

Go to the very end of this article and cut the CSS portion you like there, then paste it at the very end of the CSS code (right before the closing CDATA part - see picture below)

Make sure to replace "www.yourwebsite.com" to your website.


Below is an example of pasting the code for style F:


/*- Menu Tabs F By http://www.exploding-boy.com/2005/12/15/free-css-navigation-designs/------
*/

#tabsF {
float:left;
width:100%;
font-size:80%;
line-height:normal;
border-bottom:1px solid #000;

}
#tabsF ul {
margin:0;
padding:10px 10px 0 50px;
list-style:none;
}
#tabsF li {
display:inline;
margin:0;
padding:0;
}
#tabsF a {
float:left;
background:url(" http://www.yourwebsite.com/labeltabs/tableftF.gif") no-repeat left top;
margin:0;
padding:0 0 0 4px;
text-decoration:none;
}
#tabsF a span {
float:left;
display:block;
background:url(" http://www.yourwebsite.com/labeltabs/tabrightF.gif") no-repeat right top;
padding:5px 15px 4px 6px;
color:#666;
}
/* Commented Backslash Hack hides rule from IE5-Mac \*/
#tabsF a span {float:none;}
/* End IE5-Mac hack */
#tabsF a:hover span {
color:#FFF;
}
#tabsF a:hover {
background-position:0% -42px;
}
#tabsF a:hover span {
background-position:100% -42px;
}


Step 4: Adding Label Widget

Follow the instructions from this article, especially step B.4. After you've done with inserting the code & save it, go to Page Element option and drag the newly added widget to stay under the Header area (that we fixed so that it would accomodate this new widget.)


id='tabsF'>


If you use a style other than F, than make sure id='tabsF' reflects the correct tab, such as id='tabsE' for style E. Later, if you like a different design, just cut-and-paste the style's CSS code, then change this id again to reflect the change.


There you have it! Well-designed tabs from professionals (The Exploding Boy website) being integrated into the new Blogger Beta.


Enjoy This hack !!!

Read full post >>

Add The Blogger “Read More” Expandable Posts Link - Blogger Hack

0 commentaires

This is a pretty popular Blogger hack that lots of people have asked me about. Instead of answering to each email individually, I thought it would make more sense to write an article about it.


With this hack, you can choose to display a select amount of text from the beginning of each post as a teaser instead of showing the entire post on the front page of your blog. Then when people want to read the rest of the post, they can click a “read more” link to see the full post. This is very handy if you have lots of long articles all on one page. (Note that you’ll need to have post pages enabled in order to make this feature work.)


Step #1 - Update Your Template Code


First you need to edit your existing code so I recommend copying and pasting it into notepad or any text editor. Also, it’s smart at this point to create a backup of your template just in case something goes wrong. Now do a search (CTRL + F) within the text editor for the following code post-header-line-1. This is the default code that Blogger includes but some custom templates remove or change this code so you might have trouble finding it. If you can’t locate this text then try searching for instead. Your template will for sure have this since it’s the tag that actually prints the body of your post.


Now depending on which code you were able to find will determine how easy the next steps will be. You might need to do some detective work first in order to get this working properly in your custom template. The idea is to get this new code into your template before the tag. Keep reading and hopefully the explanation will illustrate the concept clear enough so you are able to adapt this hack to your custom template.


Add the following code below the

and
tags if you’ve got both.


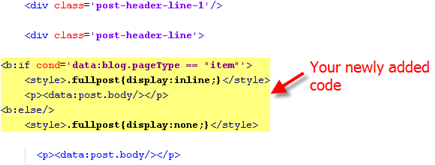
The result should look something like this:


new-code-block.png


If you don’t have the default

tag then your result should look something like this instead. This is how it would be done in the MushBlue Blogger custom template:


new-code-block-mush.png


Notice in both examples that the code in yellow and the tags are the same — it’s just tag above it that will differ based on the template you’re using.


Now let’s add one more bit of code which will actually create the “read more” link in your post. This code will go below the tag so copy the following and paste it in. Feel free to change the “Read more…” text to whatever you want the link to look like. Be careful not to delete any other code during this process.


Read more...


Yes, there are supposed to be two tags in the above code so don’t think it’ s a mistake. The result should look like this:


new-code-block-2.png


This code will be the same no matter what template you are using. Just make sure it goes below the as shown in the image above.


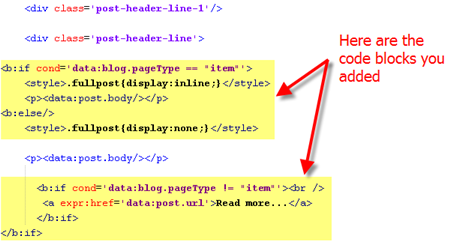
Now let’s look at what the final result should be. Here’s the updated code block you just worked on all put together:


new-code-block-3.png


Ok, you’re all done editing the template code. Paste it back into your Blogger html window and save it. If you get an error, you made a mistake. The most common mistake is to accidentally delete a > or <>

Step #2 - Add a Class Tag in Your Default Post Template


For this step, you need to navigate in your Blogger account to “Settings” => “Formatting” and scroll all the way down to the bottom. It’s the last option called “Post Template”. You’re going to paste in the following code:


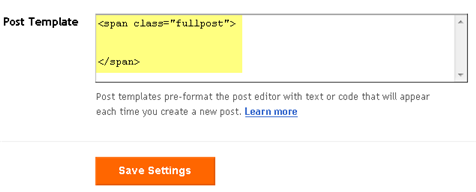
You’ll want to keep the spaces in there which will make sense later. After you save this, it will look like this:


post-template2.png


Step #3 - Create a New Post


Ok, we’ve got everything all setup so it’s time to go and test it out. Hopefully you’ve got a new post in mind for your blog. If not, then we’ll just create a test post which you can later delete. When you click on the “Posting” tab, you’ll notice that the post text area is now pre-populated with the and tags. If not, then you didn’t save it properly so go back and re-read step #2.


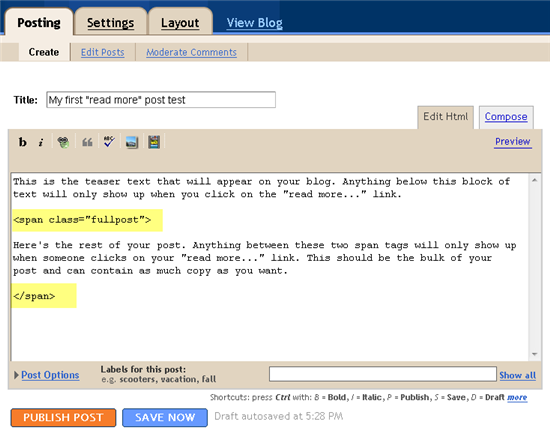
So when writing your new post, anything you put above the tag will be the teaser text. The main body of your post needs to go in between the and tags in order for the “read more…” link to work properly. See the screenshot below. Sometimes pictures illustrate better than words.


post-template-result2.png


Now publish or preview your post to see the “read more” hack working on your blog. If it doesn’t show up for some reason, go back and run through the steps again. Most likely you pasted the code blocks in the wrong places. It’s difficult to troubleshoot these issues since each template can be unique so please make sure to double-check your template before asking for help in the comments section below.


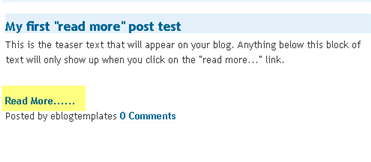
Here’s the live post with the “read more…” link properly working based on the text I used above in the post text area.


post-results.png


Additional Info


If you want to go back and update your old posts with this new “read more…” feature you can. Just go back and edit each post manually. Essentially you’ll need to paste in the and tags breaking apart the post into two parts.


For some posts, you might not want to use this feature at all. If that’s the case, just delete the and tags from within your new post text area. Then your new post will show up entirely just like it used to before you implemented this hack. Enjoy!

Read full post >>

Recent Posts Widget for Blogger

0 commentaires

With “Recent posts” widget you can show recently posted posts or you can say all posts in one list which may help your visitor to browse around your blog or site.

Here’s the procedure on how to in stall the widget on your blog :


Just copy the above code and paste it in new widget/Add page Element of your blog.
Also, don’t forget to add your sitename in the last line of HTML code where I’ve mentioned “http://yoursitename.blogspot.com”.
I mean just replace it with your sitename and you are done.
The above code refers to recent 10 postings from your blog. But if you want to change it you change it by changing the number of "numposts" in the given code

Example - If you want to show 5 posts instead of 10 then simply change numposts to 5 which will become :- numposts = 5

Read full post >>

Yahoo Search Widget Blogger / Blogspot

0 commentaires

I have mostly seen yahoo search boxes on most blogs.So i thought of implementing a cute looking yahoo search box widget for blogs.This search widget can search either your blog alone or the entire web.This is just a simple search widget which will nicely fit into your blogger sidebar..

This search box has the google branding logo inserted within the search box.By default the search widget will search your blog.The user can opt to search the entire web if he wants.. To install the widget you may use the widget installer below..


Note:-If you are reading this in a feed reader the widget installer may not be displayed properly..So just visit the original post to get it installed..

Read full post >>

Blogger Template : Minyx 2.

0 commentaires

converted from wordpress theme created by Mauricio Caballero


minyx template for blogger


Top menu is a links list

Recent Post is your blog feed

blog archive is Flat

19 spt
top menu and search fixed

Read full post >>

New blogspot template - Christmas Days- for free download

0 commentaires

Blogandweb has released a new blogger template, especially for this special occasion Christmas. It is based on the theme for wordpress "Christmas Days” from Design Disease and is available for free download under Creative Commons.

The main features include Script with countdown to Christmas, Customizable menu, style in your comments, two column design, etc.

For download and installation guide click here

To see live demo click here

For more blogger template-classic and new click here

Read full post >>

Recent Works

Latest Blog Posts